A motion capture system that uses MediaPipe for pose detection and Blender for 3D visualization. It features a personalized calibration system that adapts to individual body proportions, improving motion capture accuracy for each user.
bio-pose/
├── mediapipe-engine/           # Real-time pose detection engine
│   ├── pose_detector.py
│   ├── run_pose.py
│   ├── send_angle.py
│   ├── requirements.txt
│   ├── calibration.json        # Calibration data
│   └── depth.json              # Depth scaling data
├── Blender-engine/             # Blender-based 3D visualization
│   ├── Angles_Blender.py
│   └── Calibration_Blender.py
└── blender_real.fbx            # Custom skeleton rig for animation
The mediapipe-engine/ directory contains the pose detection pipeline using MediaPipe's Pose solution:
- pose_detector.py - Core pose detection class using MediaPipe's full body pose model
- run_pose.py - Main script for capturing webcam input, detecting poses, and computing body angles
- send_angle.py - Socket communication module for sending pose angles to Blender
- calibration.json - Stores body ratios calculated relative to torso length for individual calibration
- depth.json - Depth scaling factors (shoulder depth scale) calculated for individual depth calibration
- requirements.txt - Python dependencies
- Real-time pose detection from webcam
- Joint angle calculation using vector mathematics
- Low-pass filtering for smooth angle tracking
- Support for multiple modes: "Ratio_Calibration", "Depth_Calibration", "Angles"
- Socket communication for live data transmission
mediapipe==0.10.21
opencv-python==4.12.0.88
opencv-contrib-python==4.11.0.86
numpy==1.26.4
matplotlib==3.10.7
The Blender-engine/ directory contains scripts for 3D visualization in Blender:
- Angles_Blender.py - Receives pose angles via socket and applies them to Blender armature bones
- Calibration_Blender.py - Reads body ratios from calibration.json and scales the armature bones relative to the torso length for personalized skeleton matching
The scripts work with a Blender armature containing the following bones:
- Right side: upper_arm, lower_arm, thigh, shin
- Left side: upper_arm2, lower_arm2, thigh2, shin2
- Center: torso (single central bone)
- Host: 127.0.0.1
- Port: 5005
- Real-time angle data reception and application
The blender_real.fbx file contains a custom-designed skeleton rig created specifically for this project. This model:
- Defines the body structure and bone hierarchy used in pose animation
- Contains rigged bones that correspond to MediaPipe's detected body landmarks
- Is imported into Blender projects for real-time pose application
- Uses the bone naming convention referenced in
Angles_Blender.py

The custom skeleton features proper bone rigging with:
- Bilateral arm structure (upper_arm, lower_arm, upper_arm2, lower_arm2)
- Bilateral leg structure (thigh, shin, thigh2, shin2)
- Central torso bone as the reference point
- Proper bone alignment for realistic pose animation
- Navigate to the
mediapipe-engine/directory:
cd mediapipe-engine- Install dependencies:
pip install -r requirements.txt- Update file paths in
run_pose.pyto match your system (currently set to F drive paths)
- Open your Blender project with the provided
blender_real.fbxskeleton rig (or use a custom armature with bones matching the naming convention: upper_arm, lower_arm, thigh, shin, upper_arm2, lower_arm2, thigh2, shin2, and torso) - First, run
Calibration_Blender.pyin Blender's Script Editor to scale the armature bones based on calibration.json data - Then, run
Angles_Blender.pyin Blender's Script Editor to start receiving and applying real-time pose angles - These scripts can only be executed within Blender's Python environment
For real-time pose animation, follow this sequence:
-
Start Blender Side (First)
- Open Blender with your rigged character
- Run
Angles_Blender.pyin Blender's Script Editor - The script will start listening on the socket (port 5005) for incoming pose data
-
Start Pose Detection (Second)
- In a terminal, navigate to
mediapipe-engine/directory - Run
python run_pose.py - The script will start detecting poses from your webcam and sending angles to Blender
- You should see real-time animation of the skeleton in Blender
- In a terminal, navigate to
Important: Always start the Blender script first, then run the pose detection script. The Blender script must be listening before the pose detector attempts to send data.
python run_pose.pyThis will:
- Open your webcam
- Detect body pose using MediaPipe
- Calculate joint angles in real-time
- Send angles via socket to Blender (if running)
The run_pose.py script supports multiple operation modes by changing the Mode variable:
- "Angles" - Output calculated joint angles
- "Ratio_Calibration" - Calculate individual body ratios relative to torso bone length and store them in calibration.json
- "Depth_Calibration" - Calculate individual depth scale based on shoulder depth using upper arm length and z-depth difference, storing the result in depth.json
MediaPipe detects 33 body landmarks representing key joints and points on the human body:
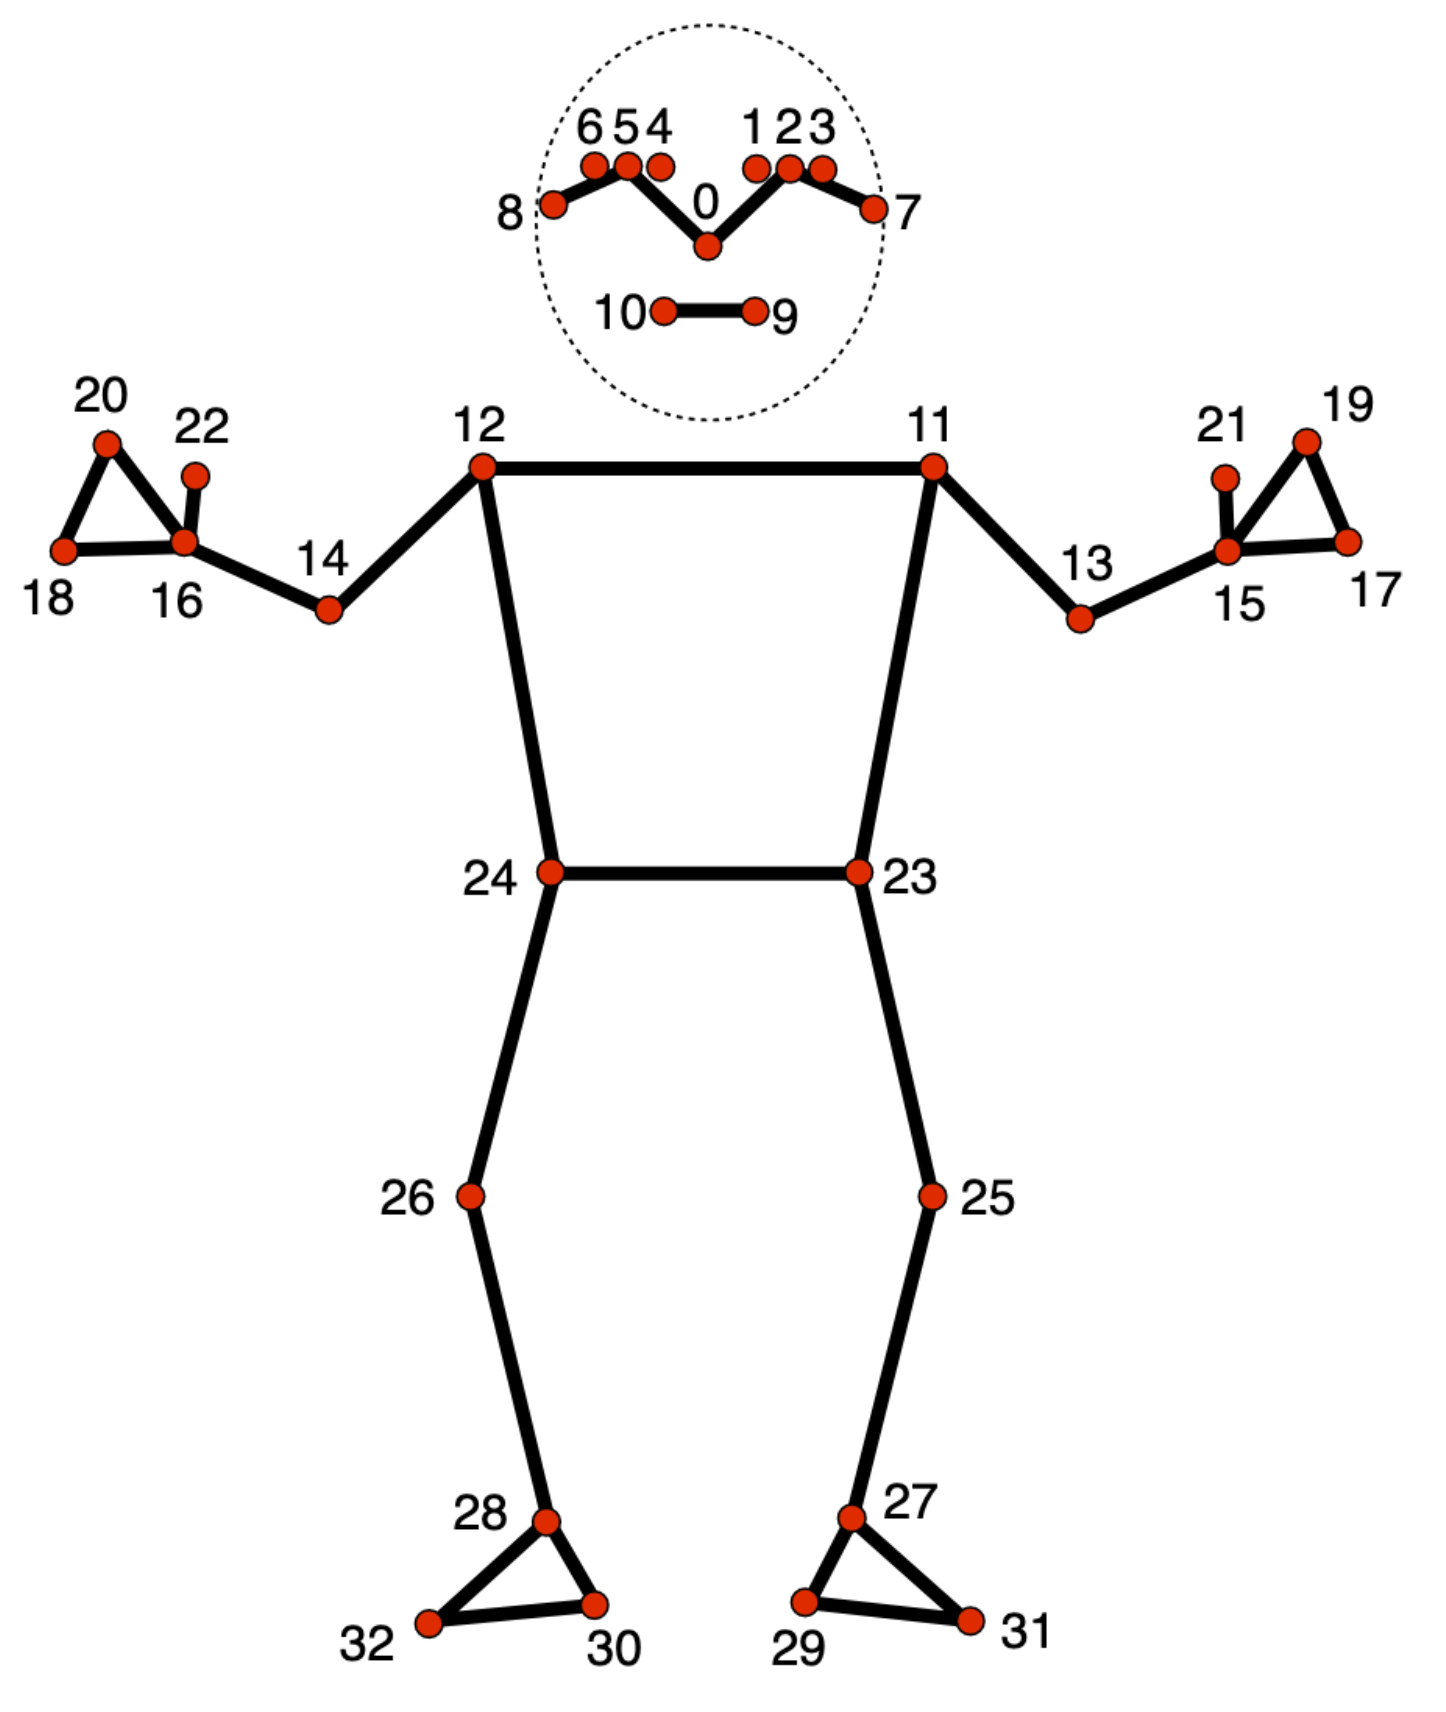
The numbered points represent:
- Head region (0-10): Nose, eyes, ears
- Shoulders & Arms (11-16): Shoulders, elbows, wrists
- Torso (11-12, 23-24): Shoulders and hips
- Legs (23-32): Hips, knees, ankles, feet
Body angles are calculated using:
- Vector mathematics (dot product and cross product)
- Three-point angle calculation (between three landmarks)
- Low-pass filtering for smoothing
- Visibility thresholding to ensure detection confidence
Real-time pose data is transmitted between the pose detection engine and Blender using TCP socket communication:
- Protocol: TCP/IP socket
- Host: 127.0.0.1 (localhost)
- Port: 5005
- Data Flow:
- Blender script listens on the socket, waiting for connections
- Pose detection script connects to the socket and sends angle data in real-time
- Angles are transmitted continuously as they are calculated and applied to the armature
- Connection Model: Server (Blender) ↔ Client (Pose Detection)
Webcam → MediaPipe Detection → Angle Calculation → Socket Send → Blender Reception → Armature Animation
- Blender Scripts: The files in
Blender-engine/require Blender's Python environment and cannot be run from command line - File Paths: Update hardcoded file paths in scripts to match your system configuration
- Socket Connection: Both scripts must run on the same machine or configured network
- Performance: Real-time performance depends on system GPU availability for pose detection
Project: BioPose - Real-time Pose Detection and 3D Animation Last Updated: January 2026